
Notice
Recent Posts
Recent Comments
Link
| 일 | 월 | 화 | 수 | 목 | 금 | 토 |
|---|---|---|---|---|---|---|
| 1 | 2 | 3 | ||||
| 4 | 5 | 6 | 7 | 8 | 9 | 10 |
| 11 | 12 | 13 | 14 | 15 | 16 | 17 |
| 18 | 19 | 20 | 21 | 22 | 23 | 24 |
| 25 | 26 | 27 | 28 | 29 | 30 | 31 |
Tags
- libopencv-dev
- translation
- 정보처리기사후기
- Python
- opengl
- rotation
- ubuntu
- NodeMCU
- 고정ip할당
- vi
- apt update
- vim명령어
- api사용해서 google drive에 폴더만들기
- annotating
- c#
- 아두이노 설치
- 우분투 opencv 설치
- google drive 업로드
- Google Drive API
- 아두이노
- opencv
- opencv resize
- 정보처리기사
- vim
- esp32
- google drive upload
- Winform
- sshkey
- opencv apt설치
- vtk
Archives
- Today
- Total
내가 보려고 만든 블로그
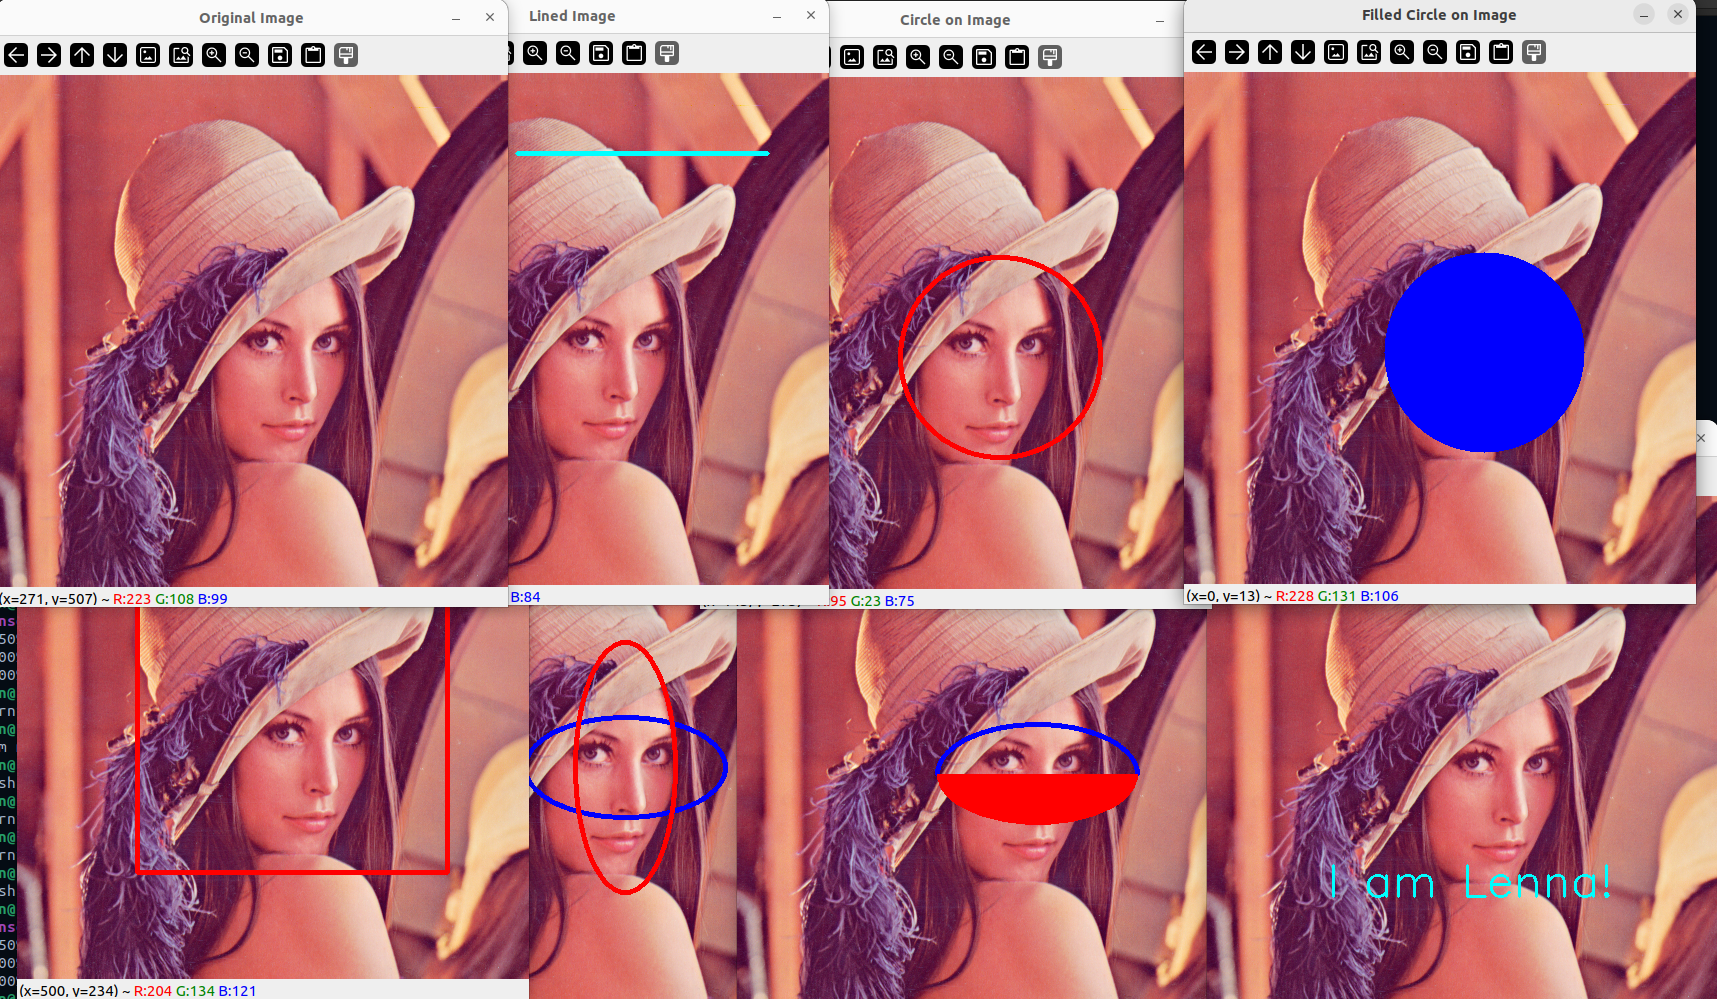
OpenCV를 사용하여 이미지에 주석 달기(c++) 본문
반응형
CMakeLists.txt
cmake_minimum_required(VERSION 3.10)
project(OpenCVExample)

find_package(OpenCV REQUIRED)
include_directories(${OpenCV_INCLUDE_DIRS})

add_executable(main main.cpp)
target_link_libraries(main ${OpenCV_LIBS})
main.cpp
#include <opencv2/opencv.hpp>
#include <iostream>

int main() {
	// read image
	cv::Mat image = cv::imread("Lenna.png");
	if (image.empty()){
		std::cout << "Could not read image" << std::endl;
	}

	// Draw line on image
	cv::Mat imageLine = image.clone();
	cv::Point pointA(200,80);
	cv::Point pointB(450,80);
	cv::line(imageLine, pointA, pointB, cv::Scalar(255, 255, 0), 3, 8, 0);

	// Draw circle
	cv::Mat circle_image = image.clone();
	// define the center of circle
	cv::Point circle_center(300,280);
	// define the radius of circle
	int radius = 100;
	// Draw a circle using the circle() Function
	cv::circle(circle_image, circle_center, radius, cv::Scalar(0, 0, 255), 3, 8, 0);

	// Draw Filled Circle
	cv::Mat Filled_circle_image = image.clone();
	// Draw a Filled Circle using the circle() Function
	cv::circle(Filled_circle_image, circle_center, radius, cv::Scalar(255, 0, 0), -1, 8, 0);

	// Draw Rectangle
	cv::Mat rect_image = image.clone();
	// Define the starting and end points for the rectangle
	cv::Point start_point(120,100);
	cv::Point end_point(430,405);
	// Draw a rectangle using the rectangle() function
	cv::rectangle(rect_image, start_point, end_point, cv::Scalar(0,0,255), 3, 8, 0);

	//Draw an Ellipse
	cv::Mat imageEllipse = image.clone();
	// define the center point of ellipse
	cv::Point ellipse_center(300,280);
	// define the major and minor axes of the ellipse
	cv::Point axis1(100, 50);
	cv::Point axis2(125, 50);
	// Draw an ellipse using the ellipse() function
	//Horizontal
	cv::ellipse(imageEllipse, ellipse_center, axis1, 0, 0, 360, cv::Scalar(255, 0, 0), 3, 8, 0);
	// Vertical
	cv::ellipse(imageEllipse, ellipse_center, axis2, 90, 0, 360, cv::Scalar(0, 0, 255), 3, 8, 0);


	//Draw a Half-Ellipse
	cv::Mat halfEllipse = image.clone();
	// define the center of half ellipse
	cv::Point ellipse_center2(300,280);
	//define the axis point
	cv::Point axis1_half(100, 50);
	// draw the Half Ellipse, just the outline
	cv::ellipse(halfEllipse, ellipse_center2, axis1_half, 0, 180, 360, cv::Scalar(255, 0, 0), 3, 8, 0);
	// if you want to draw a Filled ellipse, use this line of code
	cv::ellipse(halfEllipse, ellipse_center2, axis1_half, 0, 0, 180, cv::Scalar(0, 0, 255), -2, 8, 0);

	// Adding Text
	cv::Mat imageText = image.clone();
	//cv::putText (InputOutputArray img, const String &text, Point org, int fontFace, double fontScale, Scalar color, int thickness=1, int lineType=LINE_8, bool bottomLeftOrigin=false)
	// Write text using putText() function
	cv::putText(imageText, "I am Lenna!", cv::Point(120,400), cv::FONT_HERSHEY_SIMPLEX, 1.5, cv::Scalar(255,255,0), 2);

	// Display Image
	cv::imshow("Original Image", image);
	cv::imshow("Lined Image", imageLine);
	cv::imshow("Circle on Image", circle_image);
	cv::imshow("Filled Circle on Image", Filled_circle_image);
	cv::imshow("Rectangle on Image", rect_image);
	cv::imshow("Ellipses on Image", imageEllipse);
	cv::imshow("Half-Ellipses on Image", halfEllipse);
	cv::imshow("Text on Image", imageText);

	// wait indefinitely, press any key on keyboard to exit
	cv::waitKey(0);
	cv::destroyAllWindows();

	return 0;
}
실행하니까 다 잘나옴.
반응형
'OpenCV > c++' 카테고리의 다른 글
| OpenCV에서 컨볼루션을 사용한 이미지 필터링(c++) (0) | 2024.06.13 |
|---|---|
| OpenCV를 사용한 이미지 Rotation, Translation(c++) (0) | 2024.06.03 |
| OpenCV를 사용하여 이미지 자르기(c++) (0) | 2024.05.24 |
| OpenCV를 사용한 이미지 크기 조정(c++) (0) | 2024.05.23 |
| OpenCV를 사용하여 이미지 읽기, 표시 및 쓰기(c++) (0) | 2024.05.22 |
'OpenCV/c++' Related Articles
more


