
| 일 | 월 | 화 | 수 | 목 | 금 | 토 |
|---|---|---|---|---|---|---|
| 1 | 2 | 3 | 4 | 5 | 6 | 7 |
| 8 | 9 | 10 | 11 | 12 | 13 | 14 |
| 15 | 16 | 17 | 18 | 19 | 20 | 21 |
| 22 | 23 | 24 | 25 | 26 | 27 | 28 |
| 29 | 30 |
- google drive 업로드
- 정보처리기사후기
- translation
- vim명령어
- api사용해서 google drive에 폴더만들기
- 우분투 opencv 설치
- google drive upload
- apt update
- esp32
- Google Drive API
- ubuntu
- rotation
- vtk
- opengl
- 아두이노 설치
- opencv
- opencv resize
- 아두이노
- annotating
- sshkey
- opencv apt설치
- 정보처리기사
- NodeMCU
- 고정ip할당
- Winform
- Python
- c#
- vim
- vi
- libopencv-dev
- Today
- Total
목록전체 글 (74)
내가 보려고 만든 블로그
https://learnopengl.com/Getting-started/OpenGL LearnOpenGL - OpenGL OpenGL Getting-started/OpenGL Before starting our journey we should first define what OpenGL actually is. OpenGL is mainly considered an API (an Application Programming Interface) that provides us with a large set of functions that we can use to manipulate learnopengl.com 영어로 되어있지만 도움 많이 되었음. 크롬으로 한글 번역해서 보면 괜찮음. http://www.open..
 우분투환경에서 opengl 설치
sudo apt-get install -y build-essential sudo apt-get install freeglut3-dev libglu1-mesa-dev mesa-common-dev 이렇게 터미널에 입력하면 설치가 된다. 제대로 설치 되었는지 opengl 버전이 뭔지 궁금하면 아래 명령어를 터미널에 입력하면 된다. sudo apt-get install mesa-utils glxinfo | grep "OpenGL version" 제대로 설치되었으면 터미널에 opengl version에 대한 내용이 뜬다.
 ImGui 공부하기-설정
https://github.com/ocornut/imgui GitHub - ocornut/imgui: Dear ImGui: Bloat-free Graphical User interface for C++ with minimal dependencies Dear ImGui: Bloat-free Graphical User interface for C++ with minimal dependencies - GitHub - ocornut/imgui: Dear ImGui: Bloat-free Graphical User interface for C++ with minimal dependencies github.com 우분투 환경에서 진행함 git clone https://github.com/ocornut/imgui 터미..
OpenGL 그래픽 하드웨어의 기능 사용하게 해주는 API 하드웨어 / 운영체제와 독립적으로 사용할 수 있는 인터페이스 제공 그렇기 때문에 window 기능 같은 건 다른 걸 사용해야함 3차원 오브젝트나 사진 같은 걸 다루는 기능도 없음 점, 선, 삼각형, 패치와 같은 geometric primitive로 치환해서 사용해야함 이미지를 렌더링하기 위한 OpenGL 어플리케이션의 주요 연산들 그릴 data가 OpenGL의 geometric primitive의 어떤 shape인지 정하기 여러 쉐이더를 통해 input primitive의 위치, 색 등의 렌더링 속성을 결정 input primitive의 수학적인 표현을 screen에 대한 위치로 표현한 fragment로 치환 rasterization이라 부름 r..
 OpenGL super bible 책에서 소스코드 실행하기(ubuntu환경)
opengl super bible을 공부하고 있는데 예제파일 돌리기가 쉽지않다. git clone https://github.com/openglsuperbible/sb7code.git 이렇게 터미널에 치면 그 경로에 다운됨 GitHub - openglsuperbible/sb7code: Source code and supporting material for the 7th Edition of OpenGL SuperBible Source code and supporting material for the 7th Edition of OpenGL SuperBible - GitHub - openglsuperbible/sb7code: Source code and supporting material for the 7th..
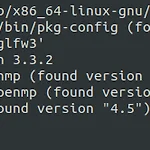
CMake Warning (dev) at /usr/share/cmake-3.16/Modules/FindOpenGL.cmake:275 (message): Policy CMP0072 is not set: FindOpenGL prefers GLVND by default when available. Run "cmake --help-policy CMP0072" for policy details. Use the cmake_policy command to set the policy and suppress this warning. FindOpenGL found both a legacy GL library: OPENGL_gl_LIBRARY: /usr/lib/x86_64-linux-gnu/libGL.so and GLVND..
1. visualstudio를 열고 도구>> Nuget패키지관리를 클릭한다. 2.sqlite를 검색한다. 여러가지가 나오는데 이중에서 System.Data.SQLite패키지를 설치한다. 3.설치뒤에 사용하고 있는 프로젝트의 참조에 System.Data.SQLite가 있는지 확인한다. 4.소스에 using System.Data.SQLite를 써주고 사용하면 된다.
Items[0].subItems[0] Items[0].subItems[1] Items[0].subItems[2] Items[0].subItems[3] Items[0].subItems[4] Items[1].subItems[0] Items[1].subItems[1] Items[1].subItems[2] Items[1].subItems[3] Items[1].subItems[4] Items[2].subItems[0] Listview가 있으면 Items.Add를 해서 내용을 넣을수 있다. int index = istview.SelectedIndices[0];으로하고 listview.Items[index]는 listview의 첫번째 칸이다. 두번째 열을 선택하고 싶으면(가로) Items[0].subItems[1]로..